I'm taking a break from watching Gravity, man that movie is intense!
Today I decided to give a polish a second first impression. That's actually something that I rarely do. Anyway, the first time I tried Push and Shove I was very disappointed. OPI did really hype it and when I tried it was like, meh. I thought it looked uneven and it showed every ridge on my nails in a very unflattering way. But today I got and idea and I just had to try it.
I started with the base coat that comes with Push and Shove, it's in a 5ml bottle and is called Lay Down That Base. The I applied two coats of Push and Shove and like last time, all my nails flaws became very visible. So I applied two really thick coats of top coat and waited until the tc was dry. After that I applied a third coat of Push and Shove and it really did the trick. The tc helped create a smooth finish making the ridges less visible. I really like how 'roboty' Push and Shove looks when it's smoother. I'm glad I didn't get rid of it!
I assume that this "technique" can be used with all super metallic colours. I love how great my robot nails look :) Have lovely evening and I'll "talk" to you guys tomorrow <3
I hope you're having a nice evening. I'm trying not to look at the TV while my BF is watching The Conjuring. I've seen two seconds of the film and I'm already super scared.
Today I'm showing you my back to school manicure. I'm going back to school tomorrow and I wanted to do a cute manicure :) The base colour is Pistacchio from NDLacquers, it's a white crelly with a drop of green. Pistacchio has green matte glitters in different shapes and golden flakes. I ended up with three coats of polish. It was very easy to apply and self-leveled perfectly. The only problem was that the larger green glitters required some fishing. It dried shiny but I always use tc when wearing polish with glitters. If you want to get your own bottle of Pistacchio head over to Edgy Polish :)
Since I'm in a nail art psychosis I decided to add some more gold with the help of nail vinyls. Below you can see a picture that shows how I placed the nail vinyls to make the smaller triangles. For the larger triangles I used straight vinyls and placed them in a triangular shape. The gold polish is Love.Angel.Music.Baby from OPI. It dries matte but added tc because I wanted a completely glossy manicure.
I love this manicure, the polish and the triangles look super cute together. That's all for now, I'll "talk" to you tomorrow. Take care!
Today I'm wearing a polish that my BF picked. He thought that it looked like christmas and thought it would make me happy since I'm a big X-mas fan :)
I must say he was right, it does look like christmas and I love it. Hogwarts, as this cute polish is called, is a clear based glitter polish. The glitters are red, blue, silver and green. It almost covered perfectly with three coats without undies. The matte black polish on my pinkie, index and thumb is Liquid leather from China Glaze with a matte top coat from OPI.
I think this mani is really cute and I love matte black polish, it's so cool. If I had to pick one polish to use for the rest of my life it would definitely be a matte black.
I'm really trying to show you more polish from mainstream brands but I suck at it lol. But today I actually managed, yay me. OPI and Barry M are two of my favourite mainstream polish brands. I have shown you In true Stefani fashion layered over another polish but never on it's own. It's a fun glitter but sadly it's not dense enough to cover completely. It does leave some VNL even after four(!) coats. Sugar apple and In true Stefani fashion looked so cute together so I decide not to let the VNL bother me. What do you think?
When it comes to Sugar apple all I can say is WOW. It's a light blue creme and completely streak-free. The application was amazing and I only needed two coats. I love the Barry M Gelly collection. When it comes to cremes they definitely have the best polish.
I'm going to show you a lovely pink creme with the very unique name 66. I've tried this brand before but haven't been very pleased with it. Then my friend Emelie told me to buy this polish and so I did. I'm so glad that I did, the polish was super easy to apply and it covered perfectly with two thin coats. It was a tad streaky but it evened out with the help of top coat.
Before I added top coat I did a reverse gradient with Rainbow connection from OPI. This is a discontinued glitter topper that I've been longing for a while. I bought it at a blog sale and I don't know why I haven't used until now, but that's pretty much the story of my life :P
With the help of Swift sparkle top coat from Pretty & Polished the manicure dried fast and shiny.
I hope you're having a great Monday :) I've got a wonderful liquid sand from OPI to show you today. I'm a big fan of textured polishes and I think that OPI's are among the best. The polish is called What's a little rain forest? and is part of OPI's Brazil collection.
This blue beauty covered perfectly with two thin coats. It didn't dry very fast but most textured polishes tend to dry rather slow. The only bad thing about this polish is that it's only available in a 3,75ml bottle. My mother gave me a mini set with four different colours and I love them, I'll try to show you the other three soon :D
Ugh, not very pleased with todays mani. I wanted to do something fun and different but I'm not really pleased with the stamping. This was my first time doing a stamping design with "lines" and it was super tricky. I guess I need to practice more.
The plate I used was sent from Born pretty store for me to review, it was given the personal name "QA84". I really wanted to try the plaid pattern. It was easy to pick up the design from the plate but it was tricky to get the design straight on the nail.
The base I stamped on is a mixup with three of OPI's tinted top coats. I used all except the yellow one. I applied them over a white polish and blended them gently with the help of their brushes. The polish I used for stamping was Samarkand from Mavala. It worked really well.
If you want to see more awesome nail art designs head over to Lelack's blog. Don't forget that you get a 10% discount when using my code CYX31 at Born pretty store.
This week Gelic' nail art and Traces of polish have arranged a Valentine themed week. I'm super excited, hope you are as well! I'm going to try to make the ordinary themed days work with my V-day manis. Such as blue Monday, red Tuesday and so on :) The green one is going to be tricky though.
First out is a pretty simple mani. IMO you can make any polish look stunning with a few rhinestones. Therefore I used heart shaped rhinestones to add a bit of a valentine feel to this mani. You can buy the hearts here. The blue polish is Peacock from IsaDora. A dark royal blue polish with shimmer. It's not matte though, the suede effect is thanks to a matte TC from OPI. Peacock's formula was average. Not bad but not great either. It was a bit runny for my taste but I managed. On my ring finger I added some shimmer from Pop Culture Cosmetics on the free edge. The shimmer polish is called Magical wedding which I found very appropriate.
On my index and pinkie I added one of my favourite white-ish glitters of all time. Care bear stare from Darling Diva Polish. Care bare stare has heart, star, hex and circle shaped glitters. I used a make-up sponge when applying the glitter. I find that very helpful as it helps to avoid the glitter from getting to thick. Another tip is to wait until the polish is kinda tacky and gently dab the polish to flatten it out.
That's all for now. If you wan't to participate on this theme week here's a link to the InLinkz codes :)
Before reading today's blog post (or scrolling down to the pictures) you need to listen this song :D
Today's theme on Nail art Sunday is "My first nail art". The idea is that you choose your first nail art posted on your blog and redo it. Only problem is that my first nail art on the blog is this one. So that wouldn't be that much to recreate since it's only one month old. Instead I decided to redo the first nail art I uploaded on my Instagram. I know that the picture isn't great but I hope you get the idea :) I did this nail art for a sci-fi exhibition my boyfriend and I went to last spring. I remember being super pleased with the result ^_^
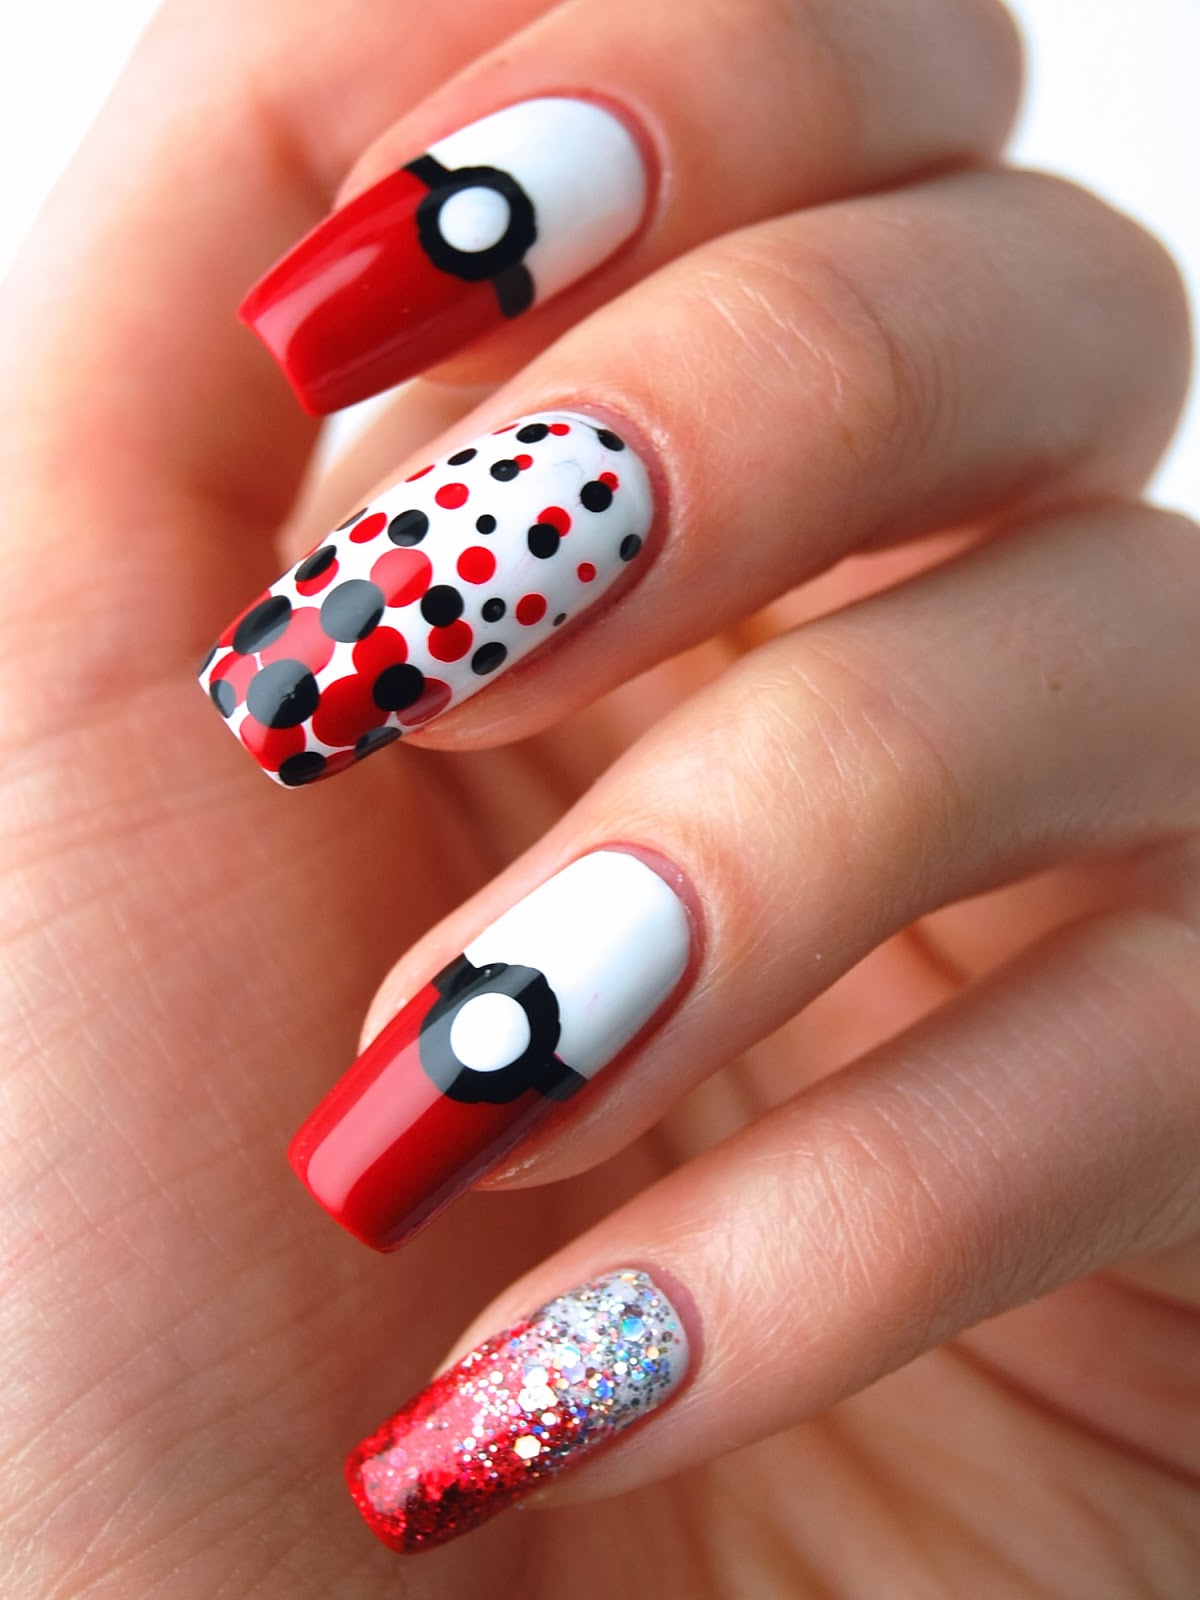
As you can se, hopefully, I did pokémon balls :D It took me such a long time to do them. I didn't have any dotting tools or nail art brushes and I remember it being SO hard to get nice thin lines that separated the red and white nail polish.
Picture taken from my instagram @cilp
And now time for the improved version of this mani! I decided to let the nail art evolve. Do you get it, evolve. Since it's a PKMN mani... Hehe... Okay I'm sorry, I promise I won't do that again. Ever.
Okay, focus. Polishes I have used are:
White = Nordic Cap NP13, Black = Nordic Cap NP12, Red = OPI - Over & over a-gwen.
Silver glitter = Darling Diva Polish - Sting ray, Red glitter = Darling Diva Polish - Little red corvette.
The nail art tools I've used are dotting tools and a nail art liner. That really does take you a long way. I started of with three thins coats of white polish as the base colour for all my nails. On my middle finger I did red and black dots in different sizes. Unfortunately when I applied SV it did smudge the dots a little bit but it wasn't to bad.
On my pinkie I applied one coat of silver glitter and dabbed the the red glitter on half the nail to get a nice fade effect. The Pokémon balls where pretty simple. I painted the outer half of my nail red. When the red polish was kind of tacky I used the nail art liner with black polish to separate the two colours. Then I added a big black dot and after that a smaller white dot in the middle of the black one. I waited a really long time before adding TC to avoid any smudging.
I really liked this theme. I often feel like haven't improved my nail art skills. This theme really showed that I have. I love the theme weeks the most. So I'm hoping there will be more themed nail art Sundays and less weeks with free choice.
Hope that your having an amazing weekend doing exactly what you want and not what you need :P I'm home alone drinking coffee and watching puppies on animal planet. Oh btw do you know where I got my blog name from? I had a true mind blown moment when I realised it. As you might know by now I love animal planet. The fun thing is that animal planets catch phrase is "Passionate about animals"... Err. So my blog name is unknowingly inspired of from animal planet LOL!
Anyway time for a dark blue beauty. This is Russian navy from OPI. Russian navy is a dark blue creme polish with violet and silver shimmer. Two thin coats was enough to achieve full opacity. The formula was great and the polish is really glossy on it's own. Pictures are taken without TC. Iv'e been trying to buy colours that aren't typical "me colours" and Russian navy is not a colour I would have chosen for a couple of months ago. Despite that I really do like it. Russian navy is classy yet different.
What do you guys think about Russian navy? Please leave a comment down below :)